Heat Treatment for Wear Parts: Quenching, Tempering and Surface Hardening
Two bucket teeth leave the same foundry on the same pallet, cast from the same heat of steel, and go to work on the same machine. One wears evenly and is replaced on schedule. The other loses a corner within weeks. The usual reaction is to question the grade, and the grade is rarely the problem.
What separates them is structure. Heat treatment is where a cast wear part stops being a shape in a known alloy and becomes a part with a particular balance of hardness, toughness and locked in stress. Identical chemistry produces different structures, and different lives, depending on how the part was heated, how fast it cooled, and what was done afterwards.
This guide is for the people who specify that condition and then accept or reject the parts. It covers the three routes, why section size limits what they can deliver, what tempering is for, where cracking comes from, how to verify a treatment rather than a number, and what to settle before the first part is poured. Material family selection is covered in construction equipment wear part materials, so the family is assumed to be settled.
Structure decides how a wear part fails
A wear part resists abrasion because of what is inside the metal: hard phases that blunt the cutting action of rock and sand, and a matrix hard enough to hold them instead of letting them tear out one by one.
Two things follow. The same chemistry can produce a wear resistant structure or a mediocre one depending on how it cooled, and the structure that resists abrasion best is usually the one that cracks most easily.
As cast, the structure is whatever the mould allowed: thick sections cool slowly and grow coarse phases, thin sections cool quickly and grow finer ones, and the difference can be visible on one casting between a heavy boss and the wall beside it. In high-chromium cast irons the as-cast structure is often the working structure, and treatment is limited to stress relief. In alloy and cast steels it is a starting point that quenching and tempering replaces.
A hardness reading describes the matrix at one point. It says nothing about carbide shape, retained austenite, grain size or decarburization, and all four change wear life.
Fact: DINGDAR (Henan Dingdar Machinery Equipment Manufacture Co., Ltd.) has produced castings since 1986, which is 40 years, and runs four in-house casting routes (green sand, shell moulding, lost foam and investment casting) across a 180,000 m² plant with a further 12,000 m² of office and engineering space (per company data).
Three routes, and the problem each one solves
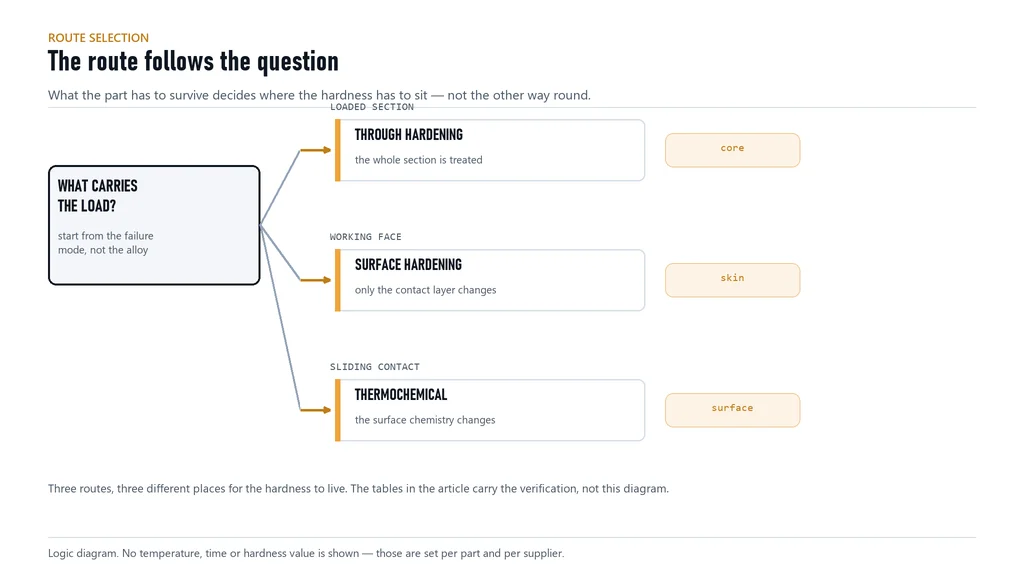
The three families answer different questions: whether the whole section carries load, whether only a working face resists wear, and whether the surface chemistry should change.
Through hardening: quench and temper
The part is heated until its structure becomes austenite, cooled fast enough to form martensite, then tempered to the hardness and toughness the job needs. Properties hold from the surface inward, as deep as the loaded zone reaches. This suits adapters that carry bending, cutting edges that take abrasion and shock together, crusher components and loaded bosses, and parts machined after treatment. The cost is risk: fast cooling creates martensite, and it also creates distortion and cracks on parts that are thick or uneven.
Surface hardening: induction and flame
A defined area is heated with an induction coil or a flame and quenched while the core stays cool and tough, so the part ends up with a hard shell over a softer substrate. That is often exactly right for a wear part: a working face that resists abrasion, backed by metal that absorbs impact instead of passing it on. Selectivity is the advantage, since a tooth tip can be hardened while the mounting end stays soft for machining and toughness. What the process does not do is harden the substrate, and a hard shell over a soft core works only while the core supports it.
Thermochemical: carburizing and nitriding
These routes change the chemistry of the surface layer. Carburizing adds carbon to a low carbon surface and then quenches, so the case hardens while the core stays tough and machinable. Nitriding introduces nitrogen at a lower temperature without a quench, which keeps distortion small but produces a thinner case. On wear parts they appear where the wear is sliding and substrate loads are moderate, and the limit is depth.
Hardenability is not hardness, and section size decides which one you get
Hardenability is the ability of an alloy to form martensite at depth. It belongs to the steel and is measured by an end quench test, in which a standard bar is quenched from one end and hardness recorded along its length (ASTM A255 describes the method, and the same idea appears in ISO 642). High hardenability means deep hardening at a mild cooling rate; low hardenability needs a violent quench even for a thin section. Hardness is what you measure on the part; hardenability decides whether you can get it where you need it.
Section size is why this matters on castings. A thick section holds heat, so its centre cools slowly however hard the surface is quenched. On a heavy boss the surface may transform to martensite while the core transforms to pearlite or bainite, leaving a hard skin over a soft centre with residual stress along the boundary. A surface reading can then pass while the core is far softer than the design assumed, and a more aggressive quench raises cracking risk faster than it raises depth.
That is one reason the casting route matters before heat treatment is even discussed. A green sand casting can hold heavier sections where a part needs mass, and can equally produce the abrupt thickness changes that make quenching difficult, because coring, ribbing and riser placement change the thermal mass to be cooled. Specify where hardness is required, not only how much: a drawing that says "hardened" and one that names the loaded band produce very different parts.
Tempering sets a position, it does not simply reduce hardness
Newly formed martensite is hard, brittle and full of quench stress. Tempering reheats the part below the hardening temperature, holds it and cools it, letting carbon come out of solution and the structure relax: hardness falls, toughness rises, stress drops.
That makes tempering sound like a correction applied after the real work. It is the step that chooses where the part sits on the hardness and toughness curve: a low temperature keeps most of the wear resistance and accepts limited toughness, while a higher one trades wear resistance for the ability to absorb impact without breaking apart.
Which end is right depends on the failure being prevented. A part that wears slowly and never breaks should be tempered toward hardness; a part that chips or shears needs toughness, even though it will wear faster. Buying both by demanding the hardest part available is not possible.
Two details belong in the requirement. Tempering should follow hardening without a long gap, because a quenched part left standing is at its most brittle, and the cooling practice after tempering is part of the process. A part re-tempered to fix a hardness miss is not the same as one tempered correctly the first time, which is why the rework boundary belongs in the order.
Distortion and cracking: geometry carries as much risk as process
Quench cracks start where stress concentrates: sharp internal corners, abrupt changes from thick to thin section, holes close to an edge, narrow webs between heavy masses, and any feature that cools at a different rate from its neighbour.
Martensite occupies more volume than the structures it replaces, so it forms with expansion. When one region transforms before another the two pull against each other, and a brittle structure plus tensile stress at a corner is how a part splits, sometimes hours later in the yard.
Design decisions are cheaper than process decisions taken afterwards. Radius internal corners instead of leaving a sharp transition, and distribute mass symmetrically where function allows. Avoid thin ribs beside heavy bosses, since they transform first and are dragged by the mass next to them. Keep functional surfaces machinable after hardening so small movements can be ground rather than straightened, and leave an allowance on faces that must stay flat.
On parts such as excavator bucket teeth and adapters, geometry is fixed by the machine interface: a tapered nose, a pin hole, a wedge seat. There is little freedom to redesign, so the process is chosen around the shape. Hardening the tip only, quenching in fixtures that hold the part during transformation, or through hardening to a moderate hardness are all answers to the same constraint.
Four combinations that go wrong on wear parts
Most heat treatment failures on wear parts cluster into patterns, each pointing at a different correction.
Too hard for the load. The part holds its shape, resists abrasion, then loses pieces at an edge. Chipping and spalling are the signature. The correction is usually more tempering rather than more hardness, and sometimes a tougher family.
Too soft for the load. Instead of wearing away, the metal moves. A tip curls, an edge mushrooms, a face flows outward and then tears off. That is plastic deformation: the strength under the working load was never enough, whatever the surface hardness said.
Case too shallow for the substrate. A thin hard layer over a core that yields will crack from beneath and break away in flakes, which looks like a bad case but is a case never deep enough for the load above it.
Hardness that is not where it was specified. A part can pass a reading at the point that was tested and still be soft in the working band. Uneven heating, poor agitation, parts stacked too closely in the basket, or a decarburized surface all produce this.
| Symptom on a returned part | What it usually means | What to change |
|---|---|---|
| Edge chipping or corner loss | Hardness above the toughness the load allows | Raise the tempering temperature |
| Mushrooming, curling, flow | Core strength below the working load | Check hardness through the section |
| Flaking or spalling from the face | Case depth below the loaded zone | Deeper case or stronger substrate |
| Crack starting at a corner | Stress concentration plus a brittle structure | Radius the corner, control the quench |
| A soft band on one side | Uneven heating or quenching | Review loading and agitation |
| Movement past the allowance | Asymmetric section, severe quench | Change the quench, control straightening |
For a bucket teeth line, tracking these patterns as they occur removes a guess from the next specification.
Verification: hardness is one reading, not the answer
A hardness test is cheap, fast and repeatable, which is why it becomes the whole conversation. It answers a narrow question: how hard is the metal at this point, on this scale, at this moment. It cannot reveal a case that is too thin, a core that never hardened, or a surface that lost carbon. That is why a survey beats a single reading: several points at agreed locations, one in the working band and one in a heavier section, show uniformity, while one number does not.
Case depth has to be measured on a section, by a hardness traverse inward or a metallographic measurement of the hardened layer, with the method and location recorded beside the value. ISO 2639 is the reference for carburized and hardened cases. Microstructure then explains the result: martensite fineness, retained austenite, carbide shape, grain size and decarburization.
| Check | What it proves | How it is sampled |
|---|---|---|
| Hardness survey | Level and uniformity at agreed points | Several points per an agreed map |
| Case depth | Depth of hardening against the loaded zone | Sectioned coupon or sacrificial part |
| Microstructure | The structure behind the hardness number | Polished and etched section |
| Coupon test | Properties the design assumed | Coupon from the same furnace load |
| Crack detection | Quench cracks or grinding cracks | Magnetic particle, penetrant or ultrasonic |
| Distortion | Fit after treatment | Functional datums and mating faces |
None of these checks has a universal pass value. The figures depend on the alloy, the section, the load and the failure being prevented, so they are set per part with the supplier and confirmed on a trial lot. DINGDAR's quality function covers chemistry, dimension, hardness, mechanical properties, microstructure and non destructive testing, so a survey, a case depth check and a metallographic statement can come from one source (per company data).
What to confirm with the supplier before the first part is poured
A requirement that is not written down is a preference. Settle these before tooling is made.
- Grade and condition, named separately. An alloy designation is a grade; quenched and tempered is a condition.
- Route and sequence. Hardening before or after machining, stress relief before hardening, whether straightening is allowed afterwards, and who performs the treatment.
- Coupon and traceability. Whether a test lug is cast and treated with the load, how it is identified, and whether it is retained.
- Report content. Chemistry, a hardness map with locations, case depth with the method, a microstructure statement, crack results, and the batch identifier.
- Rework boundary. Whether a part that misses hardness can be re-austenitized, how often, whether it can be straightened, and what happens to a part that cracks in treatment.
- Distortion ownership. Who carries the risk if a part moves beyond the machining allowance, and how much movement the drawing tolerates.
- Surface condition. Scale, decarburization, and whether the working face is cleaned, ground or supplied as treated.
Describe what the part does as well. A supplier who knows it runs in abrasive rock with occasional impact can propose a balance; one who sees only a drawing will guess toward the hardest option. Parts for construction machinery often need different treatment on the working face and the mounting end.
DINGDAR has cast wear parts since 1986 and runs green sand, shell moulding, lost foam and investment casting in house, so the section and as-cast structure that heat treatment depends on are set under one roof (per company data). More background is on the about page.
Fact: DINGDAR employs 720+ people including 52 research and engineering staff, has worked across 5,400+ part types, replies to enquiries within 12 to 24 hours and is certified to ISO 9001, IATF 16949, ISO 14001 and ISO 45001 (per company data).
The routes side by side
| Route | Typical wear parts | Main benefit | Main risk |
|---|---|---|---|
| Through hardening | Adapters, edges, crusher jaws and hammers | Uniform properties to depth; hardness set by tempering | Distortion and quench cracking on uneven sections |
| Induction hardening | Tooth tips, edge bands, wear pads, journals | Local hard face over a tough core; low distortion | Shallow or uneven case; transition zone cracking |
| Flame hardening | Large plates, rails, wide flat faces | Works on large parts without a furnace | Less consistent depth; heat affected zone |
| Carburizing | Gears, pins, bushes, sliding contacts | Hard case with a tough machinable core | Long cycle; distortion from the quench |
| Nitriding | Precision sliding parts, guides, thin sections | Very low distortion, no quench | Thin case, needs a hard substrate |
| Stress relief only | High-chromium cast iron parts used as cast | Keeps the as-cast carbide structure | Does not raise toughness |
Conclusion
Heat treatment for wear parts comes down to a decision made before the drawing is released: which failure is being prevented, and what structure prevents it. A part that resists sliding abrasion wants a hard working face, and a part that must survive impact wants toughness behind it. A part with both duties wants the two separated: a hard case over a substrate strong enough to carry the load.
Choose the route for the shape and the section, temper to a chosen position rather than to a habit, and verify with a survey, a section and a microstructure instead of a single number.
If a part is failing after treatment, send the drawing, the route and the records from the last batch. The team reviews material, casting route and inspection in one technical pass and replies within 12 to 24 hours. You can contact the DINGDAR team to start.
FAQ
Is a harder wear part always better?
No. Hardness resists abrasion, but it comes with lower toughness, and a part that cracks under impact fails sooner than a softer part that wears. The right level depends on which mechanism dominates in service. A part that wears thin gradually can gain from more hardness. A part that chips, shears or breaks needs more toughness, which usually means a higher tempering temperature and a lower hardness.
Can you harden only the surface of a wear part?
Yes, and it is often the better answer. Induction hardening, flame hardening, carburizing and nitriding all harden a surface layer while leaving the core softer and tougher. That suits wear parts, because the working face resists abrasion while the body absorbs impact. The limit is support: a hard layer over a core that yields under load will crack from underneath and spall.
Can a heat treated part still be straightened or re-machined?
Sometimes, within limits agreed before the order. Straightening a hardened part puts tensile stress into a brittle structure, and some parts crack during straightening or shortly after. Machining after hardening is normal where a grinding allowance was left, but it removes the hardened layer where that layer is thin. Re-austenitizing a part that missed hardness is a second heat treatment with its own risks.
How do I verify that heat treatment was actually done?
Ask for a hardness survey at several agreed locations rather than one reading, a case depth measurement on a section, a metallographic statement describing the structure, and a record tying the parts to a furnace load. A certificate that states a hardness range without locations, method or structure is hard to check and easy to dispute.
Why did a part crack after a change in heat treatment?
Cracks after treatment usually come from a combination rather than one fault: a geometry that concentrates stress, a structure that is harder and more brittle than before, and cooling that is more severe or less even. Review the tempering step and cooling uniformity before blaming the steel.
What should a drawing say about heat treatment?
The drawing should name the grade and the condition separately, the areas that must be hard and how hard, the depth of the hardened zone where a case is used, the surfaces to be machined after treatment, and the records that must travel with the parts. It should also state the service condition, because a heat treater who knows the working load can choose a balance instead of guessing.
Sources
- Elsevier ScienceDirect. "Hardenability: an overview." https://www.sciencedirect.com/topics/engineering/hardenability - Explains hardenability as distinct from hardness, the end quench test, and how section size and quenchant severity set the depth at which martensite forms.
- Elsevier ScienceDirect. "Case Hardening: an overview." https://www.sciencedirect.com/topics/engineering/case-hardening - Covers the surface hardening and thermochemical routes discussed here, and the relationship between case and core.